Finding Robert Rogers, Pt 4

Learn the fascinating history of Lt. Rogers, a World War II Hero from Decatur and the winding journey the author took to discovery. The story will uncover heroism, classified documents, and family lore. Robert J. Rogers received the Distinguished Service Cross (posthumously) for his heroism in connection with military operations while serving serving as an Officer of a B-24 Heavy Bomber in the 460th Bombardment Group.
Catch Up Here:
Part 4: The Forensic Investigation of a crash and the actions of a Hero
By G. Michael Pratt, Ph. D.
“If we ever get hit, I will be the last one to leave the plane”
Lt. Robert Rogers
With the end of the war and the release of American POWs, more information came to light on the events inside the aircraft and the heroism of 2nd Lt. Robert Jackson Rogers, Jr. Although Rogers and four of his crew were killed in events surrounding the crash; five others survived the explosion and fires, bailed out, and successfully parachuted to the ground. Following the war, several of them were interviewed and recalled what they saw or heard during the late morning of April 2, 1944.
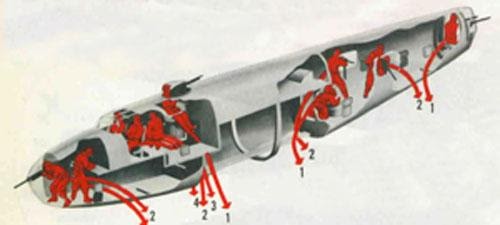
Lt. Rogers was piloting Rogers Rangers toward their target, the Luftwaffe Airfield at Mostar and flying at 20,000 feet. They were position #3 in the lead element of the lead squadron, the first of the 460th Group (and perhaps the first three aircraft of the entire mission) to approach the target. In the nose turret, Staff Sgt. Johnnie Beaver reported over the aircraft interphone that his nose turret was not working and asked for help in fixing it. Just behind the nose turret in the Navigator-Bombardier compartment, Navigator and 2nd Lt. Baily Stivers reported their position and weather to the crew. Also, in that compartment, 2nd Lt. Joseph Sundeen, Bombardier, was crouched over his top-secret Norden Bombsight, an early calculating and optical device considered the world’s most accurate. Sundeen’s device would actually take over flying the aircraft in the seconds before the bombs were released. Behind and slightly above the nose compartment was the flight deck. 2nd Lt. Robert Rogers, Pilot, occupied the left side seat and 2nd Lt. Stanley Birnsaum, Co-Pilot, occupied the right. Both positions had flying controls and the center console and instrument panel contained the throttle and mixture controls for the four engines. Either pilot could have full control of the aircraft. Through an opening between the pilots’ seats was the rear portion of the flight deck, occupied by radio operator James Caldwell and engineer/top turret gunner Charles Burns. The radio operator’s chair, desk and equipment and the flight engineer’s position. The flight engineer now occupied the top turret, standing within a rotating apparatus with his head and shoulders in the plexiglass turret. Aft of this turret, a door to the bomb bay opened into a chamber which featured bomb racks (with their now armed bombs) and a narrow catwalk that permitted crew to cross and enter the rear fuselage through another door. The ball turret (a spherical turret that enclosed the gunner and hung mostly below the aircraft) was aft of the door followed by the “waist” an open area with opposing windows, each armed with a single machine gun. The single waist gunner manned both gun positions. At the very end of the fuselage, the tail turret, like that in the nose and ball, completely enclosed the gunner. The three gunners in the rear were Wakefield Wills, William Welsh and Robert McCreedy.

Beaver (nose turret), Stivers/ Sundeen (front compartment)
Rogers/Birnsaum (Flight Deck), Caldwell/Burns (Rear Flight Deck)
McCreedy/Wills/Welch (rear fuselage)
As the formation began the bomb run, the large bomb bay doors rolled open to allow the bombs to drop. Lt. Rogers reported “Flak” over the interphone and seconds later a 20-pound 88 mm cannon shell burst against the right-side nose area of Rogers Rangers. The concussion of the blast visibly shook the bomber and the crack of the explosion was loud enough to be heard in nearby aircraft. Blast pressure, whirling steel shrapnel of various sizes and the fire from the explosion seriously damaged the nose and flight deck. Flak shrapnel ripped into the right engines and wing, which contained fuel tanks, the engine oil system, hydraulic lines, and flight control cables in addition to the numbers 3 and 4 engines. The number 3 engine (inboard) immediately caught fire, followed by the number 4 (outboard). Injured or not, the immediate response of the pilots was to activate the fire extinguishers, cut the fuel and “feather” the propellers (turn the prop blades into the wind to reduce drag and stop them from wind milling on the burning engines). The sudden loss of power caused the trailing bomber to duck under Rogers’ right wing to avoid colliding with him. On half power, Lt. Rogers’ aircraft was now rapidly falling back into his squadron’s formation (NASCAR fans can visualize a front row car in the restart pack suddenly losing speed!) so he maneuvered to the left, outside of the formation, as Lt. Sundeen called out “bombs away.” The bombs were seen to drop in trail, probably representing an emergency release. As the last bomb fell, the tail gunner of an aircraft that had now passed beyond them saw the number 2 engine (left, inboard) catch fire and shut down.
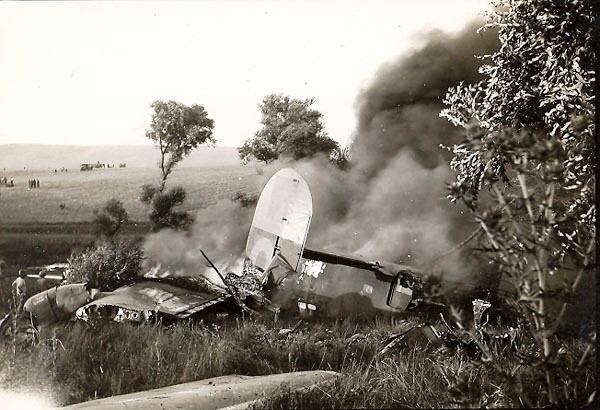
With only one engine, Rogers Rangers could no longer fly. But if Lt. Rogers and his co-pilot could prevent a stall – when the wings of an aircraft lose “lift” because of too slow airspeed or an aircraft position that interrupts air flow over the wings – they might be able to maintain a controlled descent, giving the crew time to bail out. This appears to be what happened. As nearby aircraft reported flames visible on the right wing, the top of the fuselage, and in the bomb bay, the aircraft began rapidly descending and making a wide circle to the right before disappearing into clouds below the formation. It later emerged from the clouds while making a part of a second circle before crashing to the ground in a cloud of black smoke.
Inside the aircraft, Lt. Rogers ordered the crew to bail out. First, a word about parachutes. Pilots wore “seat pack” parachutes which were attached to the harness and hung below and behind the waist when standing, but formed the seat padding when in the seat and flying. The other crewmen generally wore a harness in flight with a “chest pack” parachute attached to an aircraft panel near each crewman’s battle station. In an emergency, these crewmen grabbed the parachute chest pack and clipped it to their harness before bailing out. Pilots unfastened their seat belts and then made their way to an escape hatch. Further complicating escape was the altitude; though now rapidly losing height, the formation was at 20,000 feet. Neither the B-17 or B-24 had pressurized crew areas and above 10,000 feet, oxygen masks were required. At 20,000 feet, a person without a working oxygen mask would be unconscious in minutes and unable to pull the parachute’s ripcord. Air crews received little training on parachutes.
In the nose turret and nose compartment, the turret gunner, navigator, and bombardier could exit via a small hatch near the nosewheel, but all were thought to be killed in the explosion. At some point in the descent, Lt. Sundeen, still alive, managed to escape the aircraft via this hatch. In the rear fuselage, which was not on fire, aerial gunners, Sgts. McCreedy, Welch, and Wills found their normal escape route into the bomb bay blocked by fire but were able to drop through a floor hatch in the rear of the fuselage.
On the flight deck, Rogers himself was badly burned by the explosion and fires and the top turret gunner Sgt. Charles Burns was also injured. The other two flight deck occupants were Co-Pilot, Lt. Stanley Birnsaum and the Radio Operator, Sgt. James Caldwell. Their normal route of escape was via the door to the bomb bay behind the flight deck, but the bomb bay was engulfed in flames. Instead, they climbed through a ceiling hatch designed for use in water landings. The first crewman off the flight deck was probably James Caldwell followed by the injured Charles Burns who received help in fastening his parachute pack from Lt. Rogers. In climbing out through the roof of the burning and diving aircraft, Birnsaum thought Burns hit a propeller or the tail assembly and his parachute was pulled from the pack but did not fully open. His “streaming parachute” was seen by squadron mates in the formation above. It was the only figure they saw exiting the aircraft and several estimated that it had fallen about halfway to the ground when the streamer was seen. Co-pilot Lt. Birnsaum did not have a parachute and Lt. Rogers gave him his and helped to push Birnsaum “from the burning plane as I was unable to get out under my own power.” Birnsaum, the last to exit the flight deck said Robert Rogers was attempting to make a crash landing. He later recalled Lt. Rogers had once told his crew “If we ever get hit, I will be the last one to leave the plane.”[31]
End of Part 4
[30] Normal bail out escape routes, B-24 D. http://freepages.rootsweb.com/~webermd1/family/Liberator-Info.html [31] Individual Casualty Questionnaires (Postwar), MACR 3971: 18-32 (Fold3.com) [32] 460th B.G. crash photo http://freepages.rootsweb.com/~webermd1/family/wwII.html


